Pages

Showing posts with label GARDEN PATHS. Show all posts

Saturday, 6 July 2019

Walking the Path With Winter Roses and Healthy Root Crops

We’re going up the garden path in a new series in Design Elements; and today its segmented stone paths. Something milder than garlic in Vegetable Heroes plus what root crops give a bumper harvest in the Good Earth Segment and a winter Rose in Talking Flowers.

DESIGN ELEMENTS

Segmented Stone Paths: Garden Paths part 3
It would seem that our garden path is taking forever to finish, or maybe that it’s just so long we’re still walking on it.
So far, this series has covered gravel and paths made out of local stone, but this week it’s just a bit different.

What is segmented stone? Is that paving? 
I'm talking with Landscape Designer, and, Director of Urban Meadows Jason Cornish.
Let’s find out..

Segmented paving is pavers laid in a pattern. Councils use them in footpaths because if they need digging up to get to various services, they're easier to dig up than concrete footpaths.
If you’re thinking about doing it yourself, Jason’s tip is keeping the pavers level is the way to get a professional finish. 
Plus, it’s reasonably hard to do all the work yourself, the excavation, laying the sand bed, compacting the sand, then connecting all the pavers. 
For do it yourselfers:
  • First you need to excavate to the depth of the paver, plus sand and road base, say 100-120mm.
  • Second, use a compactor on the sand to level it off and make it a hard base.
  • For the cheats way of no cutting, choose pavers that fit the width of the path exactly. Otherwise you'll need to cut the pavers.
  • Fill in the joints with either sand or sand and mortar together.
  • The latter stops the weeds making for a happy gardener.
If you have any questions either for me or for Jason, drop us a line to realworldgardener@gmail.com or write in 

VEGETABLE HEROES

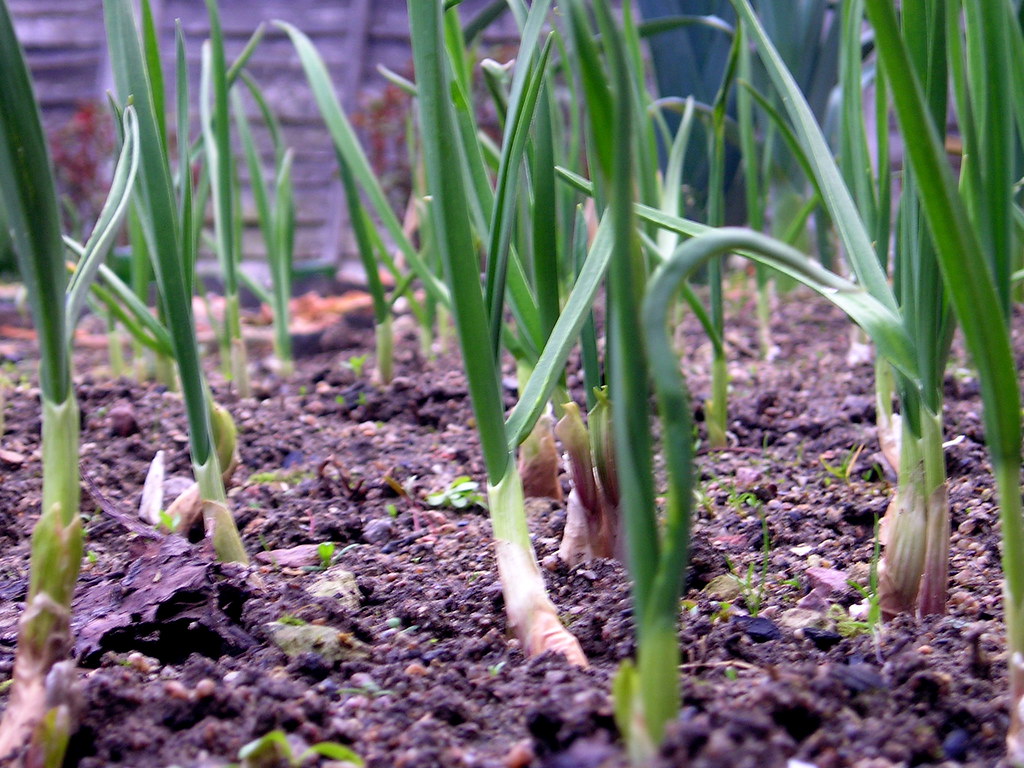
Allium var aggregatum: Shallots
Are you a fan of Garlic or is it a bit strong for your palette?
Not too fussed on garlic breath either?
 That’s why today, I’m talking about the true shallot, some say eschallot, but what are they really?
  • Shallots are Allium var aggregatum or the Aggregatum group.
They used to be classified in the onion in the Alliaceae family but now it’s in the Amaryllidaceae or lily family.
Shallots are for those of you that don’t like the taste of onions or garlic, if that’s the case, this could be the vegetable for you.
  • There seems to be confusion as to what a shallot really looks like?
What we Australians have traditionally called a shallot is in reality a scallion or spring onion.
"Shallot" is a corruption of the French "echalote" which is a small gourmet onion with papery skin which grows in garlic-like clusters and has a flavour combining garlic and onion.
So that means we treat scallions and spring onions here as "shallots".
  • How do they look different from spring onions or leeks.
    Shallots
Unlike onions or leeks, shallots are made up of cloves – similar to garlic cloves.
  • So why grow them?
First of all, growing shallots in your garden is very easy and Shallots may be harvested green for use in salads, or dried for use as a flavouring.
You can even use them as a green vegetable, by pulling the stems when they’re about 6 mm in diameter.
The outer skin is peeled off and the roots trimmed before washing to use in the kitchen.
When shallots are being grown for the mature bunches of cloves, which have a more delicate flavour than onions, they are left until their tops dry off.
The bunches of mature cloves should be pulled before the tops become  too dry and papery.
True Shallots grow in small, tight clusters so that when you break one open there may be two or three bunched together at the root. They have a brown skin and remind me of a giant garlic clove in shape only.
Shallots won't make you cry.
  • Unlike garlic and onions, shallots don’t have that strong sulphuric aroma and irritating fumes.
They’re easy to grow, mature faster and  require less space than onions and garlic.
To get the most from these tasty plants in the garden, it may help to practice some important tips for growing shallots.
The best way how to grow shallots is in loose, well-drained soil you’ve where you’ve added organic matter.
They also prefer those parts of your garden that receive full sun.
When to Plant?
Shallot seedlings
In temperate and sub-tropical climates you can plant them almost all year from February to September.
In cool temperate climates you have all year except for June and July, and also for arid climates you can only grow them between September and February.
So wait until then, although I saw a post from Arthur the mad gardener who says he lives in an arid part of Australia and he planted his shallots in May.
Shallots are normally grown from small starter shallots or sets (immature bulbs) that you can either buy from a catalogue, online or your local garden centre right now in fact.
Plant shallots sets about 2cm deep with the tips slightly protruding from the soil’s surface. Space shallots about 20cm or eight inches apart to prevent overcrowding.
  • If you do use starter bulbs think carefully about when you intend to plant them.
  • Seed shallots are living things, not dried seeds in a packet, and need to be bought just before planting time.
If you have trouble buying shallots or don’t have access to the internet, most supermarkets have shallots but they’ve have been sprayed with a chemical to stop them sprouting.
However, I’ve read about this trick that might start you off.
  • Buy a shallot from the supermarket, place it in a small container, then put in 5mm of water with a little liquid fertiliser or seaweed extract.
  • Leave for three or four days but check the base for signs of roots.
  • If all goes well separate and plant.

TIP: Once you get shallots growing in your garden, you have them forever by just saving out a small part of each year's crop as next year's starters.
  1. Some tips for growing shallots –give them a good watering once you’ve planted them but ease off the watering as they mature, unless your district has been overly dry.
  2. In the middle of Spring, you can if you want to, remove some soil around your shallots to expose the bulbs –that speeds up ripening because they develop better on top of the ground.
  3. Having said that, add a light layer of mulch to retain moisture while keeping weeds to a minimum.
  4. If you want well-defined cloves of shallot, feed plants often.This is where worm or compost tea come to the fore, because in cooler weather, liquid fertilisers are the only ones that actually do any good for your plants.

Planting in winter means that they should be ready around springtime
  • When the bulbs are about a 1cm around and the leaves are starting to yellow, that’s the time to lift your shallot bulbs.
  • Shake off any soil dry them out in a warm dry area for a week before storing them in a cool dry place.
Why are the good for you?
Shallots can be easily digested and contain 6 times more phenolics than the lowest-ranked onion, the Vidalia. They are an excellent source of vitamin C, potassium, dietary fibre and folic acid and also contain calcium, iron and protein in large quantities.

Shallots contain anti-bacterial, anti-viral, anti-allergic and anti-inflammatory properties. Apart from all that, their mild flavour makes them a must in the best of kitchens. Happy shallot growing everyone.
With their mild onion and garlic flavour, shallots are considered an essential ingredient for flavouring nearly any dish.
That was your vegetable hero segment for today

THE GOOD EARTH

Harvesting Root Crops
There are plenty of shall we say, perennial root crops that go dormant in winter in temperate and cool climates, but need to be in a spot where they remain for several years.
These plants are economical to grow because they’re pretty easy and give you a bumper crop from just one plant.
Turmeric plant photo Margaret Mossakowska
 Although these vegetables hail from tropical countries, because they die down in winter, you can grow them anywhere.
Pictured is an easy to grow tumeric plant, tumeric tubers and the cut tubers before drying
Let’s find out.
I'm talking with Margaret Mossakowska of www.mosshouse.com.au


Turmeric tubers photo Margaret Mossakowska
Margaret suggested, turmeric, ginger, yacon, sweet potato, horseradish and comfrey as some of her best root crops.
These can be grown in the coolest parts of Australia because they become dormant during the winter months.
The general rule of thumb is to harvest them when the leaves turn yellow.
If you have any questions for Margaret or for me, you know what to do.

TALKING FLOWERS

Winter Roses: Helleborus orientalis, Helleborus niger, Helleborus x hybridus
Family: Ranunculaceae along with buttercups and ranunculus.
The common name is winter rose or Lenten rose because if flowers in winter. Looks rose-like don't you think?
Floral meaning: Floral Meaning: said to provide protection and a vase of hellebore, brought into 
a room will drive away an unpleasant atmosphere and replace it with tranquility.
  • ·         Hellebores grow best in part shade, with moist but well-drained soils. They will, however, tolerate most soils as long as not waterlogged.
  • ·         Slow to get established, and can be left alone for years.
  • ·         Don’t like being disturbed as this sets them back.
  • ·         If you do want to divide, or need to transplant, autumn is best. 
  • ·         Dig the whole plant, wash off soil, then divide with a sharp knife between growth buds.  Leave at least 3 buds on each division.  
  • Mercedes' Tip: · Make excellent cut flowers, that last up to 5 days. To extend their shelf life, plunging the stems, up to their necks in boiling water, before placing them in a vase.
I'm speaking with Mercedes Sarmini, floral therapist of www.floralgossip.com.au
Video was recorded live during broadcast of Real World Gardener radio program on 2rrr 88.5 fm

Saturday, 29 June 2019

Protecting Peppy Plants and Stone Paths.


We’re going up the garden path in a new series in Design Elements; and today its in stone. How to protect those seedlings from cold weather in Vegetable Heroes plus plant that was discovered 65 years before botanists ever heard of it in Plant of the Week; and where do insects go in winter in the plant doctor segment.

DESIGN ELEMENTS

Garden Path Series:Stone Paths


  • Garden paths are essential in anyone’s back or front yard but are you happy with your garden path or would you like one that is a bit less work to maintain?
  • Last week we mentioned the pros and cons of a gravel path which was the easiest to install and also the cheapest, but what about local stone in a path?
  • Local stone can be sandstone, granite, slate bluestone or even limestone.
  • But what do you need to do to make this path?

Let’s find out
  • I'm talking with Landscape Designer, and, Director of Urban Meadows Jason Cornish.


There’s a few things to think about when putting in a stone path, chiefly the minimum size of stone which will prevent any trip or twisting injury. 
You need to be able to stand on the stone without thinking you'll overbalance.
The stones should also be placed so that it fits your walking gait.
You can use any local stone from your area, sandstone, granite, bluestone etc, which can look very nice in an informal setting more so than a formal setting.
There are a few pitfalls with putting in gravel or decomposed granite between the stones, so not advised to have it leading to your front door.
If you have any questions either for me or for Jason, drop us a line to realworldgardener@gmail.com or write in to 2RRR PO Box 644 Gladesville NSW 1675

VEGETABLE HEROES:

Protecting Seedlings from Cold and Frost.
This week’s Vegetable Hero is about keeping your seedlings warm through the winter months.
  • Extreme cold can stunt or kill your vegies so today, I’m going to go through some ideas for you to try out to help keep your seedlings warm and cosy.

First Idea:
The first idea is pretty simple and could be just right for all your seedlings, although you may need to collect quite a few plastic 2L drink bottles.

The first thing you need to do is remove the label from the bottle and then cut it in half.
You can actually use both halves but put some holes in the bottom half to let heat or humidity from building up and cooking your seedlings.
Leave the top off on the other half.
Mini Greenhouses:
Mini-greenhouses are good for small seedlings as well.
They usually have a clear plastic top with vents over a plastic tray.

If you’re really keen, you can buy a heat pad that’s just for seedlings.
The heat pad needs to be on at least overnight and it should raise the temperature of the potting/seed raising mix a minimum of 5 degrees.
I found one that you can buy online from a company based in Dromana.
The specifications say that you can germinate seeds faster with this simple,
well-priced heating mat which creates a surface temperature of between 10-20c above the ambient room temperature.
There is no controller, so to adjust the soil temperature increase the spacing between the mat and the tray.
The mat measures just 52cm x 25cm, and can be used with any pot or tray size.
You can also use heat mats to help cuttings take root faster at other times of the year.
There are similar designs elsewhere online some of which you can buy as an extra, a handy thermostat.
Using Horticultural Fleece 
Another idea is to buy some horticultural fleece or nursery grade plastic, like the ones used for poly tunnels.

  • You’ll then have to make some supports from wire in the form of hoops, over which the plastic or fleece can rest.
  • The plastic or fleece will allow enough light to penetrate so that they’ll get their minimum hours of 6 hours sunlight a day.
  • You’ll probably have to remove the cover though for watering and fertilising purposes.

Polytunnels for the Really Cold Places
For those districts that get a lot of frost or have very cold winter, you may want to install a polytunnel.
Polytunnels are usually made of steel and in Australian there are three different varieties of covering: polythene, net, and fleece, creating perfect cover for your vegetable garden rows to keep heat in, and protect plants while they’re growing.

The polyethylene is UV-stabilised 150-micron forms a complete barrier, keeping in the humidity and warmth while protecting against frosts, harsh weather and some pests.
The other benefit is that not only any pests that are around are excluded, the season for cold sensitive crops is extended.
If you go the fleece option you can keep your plants toasty warm, even in cold, wet weather and get the advantages of the net and poly tunnels rolled into one. Standard: L300 W45 H30cm
One disadvantage with these is that the rain doesn’t penetrate so irrigation is required and pest and disease problems can build up quickly in the enclosed space.
  • A polytunnel should be easy for you to access, not too remote from your house, and have an adequate water supply available.
  • It’s best to build a polytunnel on level ground in a sunny but sheltered position. Leave yourself at least a metre around the outside of the polytunnel to make it easier to build and maintain.
  • Another tip is use a thermometer that indicates the maximum and minimum temperature so that you can track the changes in your polytunnel’s climate. Also make sure that doors, windows and vents are open as the weather warms up so that the polytunnel interior doesn’t over-heat.
  • Poly tunnels are also relatively inexpensive.

PLANT OF THE WEEK

Pilea peperomioides: Pilea pep
This plant has a really interesting backstory.
  • It’s common name is Chinese Money plant or Friendship plant, but I think there’s a few plants around with those same common names.
So as I always say, you need to know the scientific name to avoid confusion if that’s the case.
Let’s find out.
I'm talking with Jeremy Critchley, www.thegreengallery.com.au


Pilea peperomioides or Pilea pip,as it’s called in Jeremy’s nursery, was discovered and grown years before scientists ever got a hold of it.
It never occurred to anyone, that it was a new species until a member of the public want to know it’s real name.
How good is that?
Easily grown indoors or on a warm verandah because it doesn’t like to be below 15 degrees C much
  • Hot Tip: healthy Pilea peperomioides plants produce baby plants both from their roots and their stems.
  • Keep it away from direct sunlight. 
  • Likes to be kept moist but not overly wet.
  • Although it can be kept outside in warmer regions, Pilea peperomioides is only suitable as a houseplant in most locations. It doesn’t appreciate temperatures below 10 °C and should be protected from sudden temperature swings.
  • Pilea peperomioides will produce little plantlets growing in the soil next to the mother plant a. Once these have grown to a size of around 5-7 cm they are large enough to separate.
  • Cut away the plantlet with a sharp, clean knife. They should already have their own root system and can simply be potted up.

PLANT DOCTOR

Where Do Insects Go Over Winter?

Have you ever thought what happens to insects in winter?
In particular insect pests, we don’t see as many pests but come Spring, they seem to emerge in their hundreds from somewhere.
How are they managing to hang on, especially in those districts where temperatures fall below zero.
You’ll be surprised to find out the methods that insects use .
So let’s find out.
I'm talking with Steve Falcioni from www.ecoorganicgarden.com.au

Is it really winter? Monarch Butterfly
Did you know that the shorted daylight lengths of Autumn trigger insects to enter something called diapause.
What’s that? 
Well, diapause (and also the definition of an evening spent watching TV) is "an inactive state of arrested development."
Diapause insects sees their metabolic rate drop to one tenth of what it is normally so it can use stored body fat to survive winter.
If you have any questions about insects, why not email us realworldgardener@gmail.com or write in to 2RRR PO Box 644 Gladesville NSW 1675