Pages

Friday, 6 March 2015

A Cut Above Roses and Carnations

REAL WORLD GARDENER Wed. 5pm 2RRR 88.5fm Sydney, streaming live at www.2rrr.org.au and Across Australia on the Community Radio Network. www.realworldgardener.com
REALWORLD GARDENER NOW ON FACEBOOK
Real World Gardener is funded by the Community Broadcasting Foundation (CBF).
The complete CRN edition of RWG is available on http://www.cpod.org.au/ , just click on 2RRR to find this week’s edition. The new theme is sung by Harry Hughes from his album Songs of the Garden. You can hear samples of the album from the website www.songsofthegarden.com

TOOL TIME

with general manager Cut Above Tools-Tony Mattson www.cutabovetools.com.au


My bypass secateurs photo M Cannon
How many times have you left your secateurs somewhere in the garden and have forgotten where you put them?
Forgetting that you left your garden tools outside is a pretty common problem amongst gardeners, because us gardens can be pretty busy multi-tasking between pruning, weeding and planting.
But if you look after your tools properly they’ll last a lot longer and work better.
Let’s kick of this series with a quick look at looking after your secateurs.

Anvil secateurs
When you buy new garden tools, you’ll probably have to decide whether you’re going to get low price/low quality or high price/high quality tools.
But no matter which one you get, they’ll last a bit longer if you look after them by at least wiping them down at the end of the day with the methylated spirits or bleach solution.
We can’t do much about where you left them last except maybe to say, put them down in the same place each time where you’ll notice them.
If you have any questions about cleaning your garden tools or a photo of some tools that you want help with, send it in to realworldgardener@gmail.com or write in to 2RRR P.O. Box 644 Gladesville NSW 1675.

VEGETABLE HEROES

CELERIAC
Ever heard of the ugly duckling of the vegetable world?
I could think of several but Celeriac or Apium graveolens var rapaceum has been described as the ugly duckling of vegetables, or just plain ugly.
But if you don’t think of vegetables as pretty or ugly, don’t be put off by all that talk because it’s pretty useful to have in your garden.
Celeriac is closely related to celery even though it looks nothing like it.
The early Greeks called celeriac, selinon and it’s mentioned in Homer's Odyssey in 800 B.C.,
That means, Celeriac has been grown as an edible plant for thousands of years.
But it wasn’t until the Middle Ages that celeriac became an important vegetable .
From that time on, it spread from the Mediterranean, finding its way into Northern European cuisine.
 
Celeriac looks like it might be the root of something, but it actually is the swollen stem.
The usual size you see in the supermarket is roughly 10cm, a very pale brown, rough, almost acne’ed looking ball with lime green tops.
The green tops look a bit like celery, and the smell is similar but a bit stronger.
The thick, rough brownish skin covers a creamy white, crisp inside that’s slightly hotter tasting than celery.
Celeriac also grows more easily and keeps longer than celery, making it an excellent winter vegetable.
You also don’t have to do any of that blanching the stems as they’re growing like you do with celery.

When to grow it?
In sub-tropical areas you can sow the seed in March, April and August.
In arid areas, you’ll have to wait until next Spring and in most other regions of Australia, you can sow the seed in Spring, Summer and Autumn, except for the tropics. It’s not really suited to that region.
But should you be listening somewhere in tropical Qld, and have grown Celeriac, please drop us a line about your success.
Celeriac is best planted at soil temperatures between 8°C and 21°C.
Hot summers won’t suit this plant. Wait until this hot weather takes a break or  start the seeds off in punnets.
Tip:Celeriac seeds are a bit hard to germinate, but if you soak the seeds in a saucer of water with a splash of seaweed solution, this will help the germination rate.
Like a lot of members of the Celery family, Celeriac likes soil that has plenty of organic compost and manures, otherwise, it’ll bolt to seed.
If you start your Celeriac seed in punnets, you can control the moisture content of the mix more easily rather than in the garden bed.
Transplant when there’s at least 4 leaves.
Celeriac loves wet soil. You can’t water it too much, and a thick layer of mulch will help in keeping the soil moist.
If you don’t water it enough you might get hollow roots or the plant will bolt to seed.
Keep the weeds down as well because celeriac doesn’t compete well with weeds,  but don’t disturb its shallow roots.
 
As the root develops, snip off side roots and hill the soil over the developing root.
Side dressing periodically during the growing season with an organic fertilizer high in nitrogen, like chook poo, is also helpful, but don't overdo it, otherwise you’ll get lots of leaf, rather than root, growth.
Celeriac, like many "roots", is a long-season, cool-weather crop;
slow-growing, taking around seven months from seed to  maturity (that is, about four months from transplanting), although the root is edible at any earlier stage.
As a rule, the longer you leave celeriac in the garden, the larger the root gets; some say they don’t really get woody when large, while others say dig them up when they’re small (10cm diameter) –
And again, some say celeriac is frost-tender, while others say a few light frosts won't bother it.
I’ve heard that "celeriac increases in flavour after the first frost.
You can leave them in the ground over-winter, harvesting as you need them..
One other thing, some recommend drawing soil up around the stems in early autumn, to blanch them; but that’s entirely up to you and I tend not to bother.
When it grows, the swollen Celeriac stem tends to push itself out of the soil, sitting just a few centimetres of soil level.
If it doesn’t do that for you, you might have to give it a helping hand, and scrape away some of the soil towards the end of the growing season.
Apart from the long growing season, pests don’t seem to like Celeriac, so a bonus. No spraying needed.
Celeriac mash
What do you do with this vegetable?
Whatever you do with potato you can do with celeriac.
You can also eat it raw. –can grate it or cut it into thin strips or cubes, and to serve it as a salad seasoned with a dressing.
Celeriac can also be cooked, either on its own or together with other vegetables.
It makes a good puree mixed with potatoes, but best of all, it makes a non-starch substitute for potatoes.
Why is it good for you?
Raw celeriac is an excellent source of potassium and a good source of vitamin C, phosphorus, vitamin B6, magnesium and iron.
Cooked celeriac is a good source of potassium and contains vitamin C, phosphorus, vitamin B6, and magnesium.
Celeriac is said to be diuretic, demineralising, and a tonic, and stimulates the appetite and cleanses the system
AND THAT WAS YOUR VEGETABLE HERO SEGMENT FOR TODAY!
 

DESIGN ELEMENTS

with Louise McDaid landscape designer.
So you’ve decided to go ahead with the vertical garden anyway. We’ve mentioned the pitfalls over the last two weeks and today, we’re giving a more positive outlook because we’re assuming you, the gardener still wants the ambiance and presence of a vertical garden.

Vertical Garden photo M Cannon
Let’s find out some more

Vertical gardens can be custom built to suit any area.
You can buy a simple bracket system that supports individual pots. Each panel houses five click-in pots, and can be hung vertically or horizontally.
There are even vertical garden modules you can buy that are made out of bamboo and self- watering. These systems are small enough to fit on any balcony.
Vertical gardens add a natural beauty to any room, courtyard or building and also reduce the urban heat island effect.
Plus plants create a sense of well being so it can’t hurt to squeeze in some more.

PLANT OF THE WEEK

with owner The Green Gallery Nursery Jeremy Critchley www.thegreengallery.com.au/
and Karen Smith from www.hortjournal.com.au

Tuberous Begonia-rose formation. photo Jeremy Critchley-The Green Gallery Nursery
You probably like rose and camellia flowers, but what about a plant which has flowers that look like both of these plants?
Rose form or camellia flowered begonia.
The large double flowers have rounded petals and a rosebud- like centre giving them a more formal look.
These plants can also have ruffled flowers tuberous that have serrated, scalloped or heavily-waved petals.
Some of these look like large carnations and some also have a rosebud centre.
Let’s find out about this plant.


Tuberous Begonias are a cool climate plant, not sub-tropical.
 People grow them well in Sydney, Perth and south of these areas.

Most begonias prefer warm, moist conditions. The ideal temperature range is 150 to 260 Celsius though most will tolerate range is 150 to 26 0C and some will tolerate temperatures as high as 400C and as low as 50C - some even lower.
All begonias prefer well drained soil rich in compost or organic matter and some like some degree of shade

Tuberous Begonias-carnation formation.  photo J Critchley The Green Gallery Nursery
 If you’re unsure, it is best to try cheaper bedding begonias first, then progress to more showy large flowered plants.
Choose a place where plants like ferns, fuchsias, hostas or cymbidiums grow.
 Give them good light, but not direct sun (shade cloth ideal).
 Not too much wind.
 Not indoors – Tuberous Begonias need cool nights.
Their active growth stage is between October and May.
When the Begonia is dormant in winter, it’s best to lay the pot on its side to keep the pot dry.

Sunday, 1 March 2015

Diving into Spires of White

WILDLIFE IN FOCUS

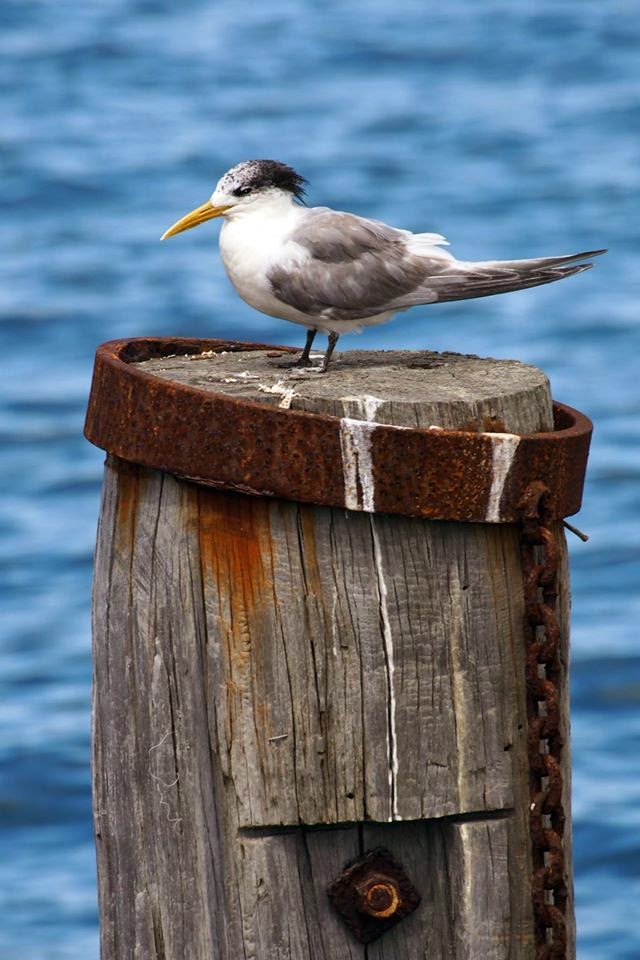
The Greater Crested Tern is the second largest of 18 different terns found in Australia.
Like most terns, the Greater Crested Tern catches its prey by plunge-diving.


Crested Tern photo Sabrina Ferguson St Leonards Victoria
They first locate their prey by hovering above the surface of the water, before swooping down and either picking food from the surface or diving below to catch its prey. They even try to steal food from others in the same family.
Let’s find out what this bird is all about…I'm talking with  ecologist Sue Stevens

The Greater Crested Tern is found around sandy beaches with fish and safe breeding sites that includes sand dunes with spinifex.
A Tern on the beach photo S. Ferguson St LeonardsVictoria


The Crested tern is an adaptable species that has learned to follow fishing boats for jettisoned bycatch, and to use unusual nest sites such as the roofs of buildings and artificial islands in salt pans and sewage works.
St Leonards Vic. photo S. Ferguson
The greater crested tern is vulnerable because they nest on the ground so dogs let loose on the beach can scare them off leaving in the eggs to chicks exposed.
Also the tern's eggs and young are taken by gulls and ibises, and human activities such as fishing, shooting and egg harvesting have caused local population declines.
You can help protect the Greater Crested Tern by:
organising a day to pick-up litter on your local beach
 not getting too close to tern nests as disturbance can distract them from caring for their young.
If you have any questions about Crested Terns or a photo send it in to realworldgardener@gmail.com or write in to 2RRR P.O. Box 644 Gladesville NSW 1675.

VEGETABLE HEROES

Florence Fennel Foeniculum vulgare dulce and var. azoricum
Did I really mean Florence Fennel?
You might think that I’m trying to get you to grow that roadside weed that is found all over Australia.
No, I’m talking about the culinary fennel. That other fennel was probably the Fennel  mentioned in the seed  inventory list brought out to Australia by the First Fleet in 1788.
Fennel is a member of the Apiaceae family, the members of which include parsley, caraway, dill, cumin and anise.
Did you know that in Ancient Greece fennel juice was used as an effective cure for poor eyesight, night blindness and cataract?

The real fennel (Florence fennel Foeniculum vulgare Azoricum Group;) is a cultivar group with a sort of bulb at the base that you can use in cooking, salads and stir fries.

The bulb part is sort of a squat flattened oblong with  four or five smooth stalks coming out the top. These stalks are hollow with a white pith inside.
On top of the stalks are feathery, finely divided linear leaves, and if you let if flower, they’ll be yellow followed by greyish brown seeds.
They’re also edible.
Also the real fennel or Florence Fennel has a much milder anise-like flavour, than wild Fennel and is more aromatic and sweeter.
Fennel really only grows to about 60cm and we tend to grow it as an annual although it is a perennial.
This plant is best in hot, dry climates but will grow in practically all climates of Australia, yes Melbourne and Canberra is fine.

When to Sow.
Sowing at the right time of year is important because if you sow too early, cold can cause bolting; if you sow too late, plants won't fatten up before the winter
Now is ideal, when the temperature is stable, day length is consistent and there's at least 16 weeks for bulbs to develop.
In sub-tropical areas, you can plant or sow seeds from March until May, in temperate zones, from February until May, in cool temperate zones, you have from February until about mid- March, and for cold or mountain districts, it was February then not again until November/December unless you have a greenhouse.
For arid areas you have March and April and again in July.

Should you have a soil thermometer, Fennel is best planted at soil temperatures between 10°C and 25°C  and as a general rule of thumb, soil temperatures are around a few degrees cooler than the current air temperature.
It resents disturbance and responds to any shock by bolting: so you’ll only get feathery fronds and flowers, but no swollen stems.
Because the bulb grows only partially below ground, and mostly above ground it suits those districts with heavy soils.
 Otherwise, you can grow it in a pot-by itself.
Florence Fennel isn’t too fussy with soils as long as the veggie bed, or garden bed is well drained as has compost or decayed animal manure dug in.
In cool temperate districts cut back the plant to about 10cm above the ground as winter draws nearer.
Fennel likes a well-drained fertile soil like most vegetables really.
 When planting your Florence Fennel seeds –sow them about 5mm deep, and unless you’ve got a lot of space, you don’t need more than 2 or 3 because they need spacing of about 30cm.
Never let the soil dry out because water is needed for germination, steady growth and swelling.
If roots become visible or plants seem unsteady, earth them up to stabilise them.
This will also help make bulbs white and tender and, later, exclude frost.
After about 6 weeks you can hill out the soil around the emerging bulb so that, like Celery, the base stays white and is more tender than if you let the sunlight turn it green.
Hilling up is just mounding soil or mulch around the base of the plant.

You can make sleeves out of newspapers or use bottomless milk cartons to keep the hilled soil from getting into the leaves of the Fennel plant.
Plants take several months to mature that’s 3-4 months after sowing.
When they look big enough to eat use a garden fork to loosen the roots and cut the bulb off about 2.5cm above the ground.
This way you’ll get more feathery shoots that can be used as celery/dill-flavoured seasoning in the kitchen.
An advantage of growing Florence fennel are that it attracts parasitic wasps and very small Praying Mantises.
It’s free of pests and it looks great and the Fennel bulb is delicious baked, too.
Why not try it grated raw in a salad or baked in lasagne.?
Cooking with Florence fennel
The bulb is best sweet, ripe and fresh (try it raw in salads) but it will also keep for several weeks in a cool, dry place

The small bulbs are delicious finely sliced raw in salads with orange and radish. The larger, woodier bulbs are better cut into slices and baked.
Where do you get it?
You can get root cuttings from plants that have been lifted during spring, so any if you attend a garden club, ask if any members have this plant.
There are plenty of seed suppliers in Australia that have Florence Fennel Seeds.
Try these companies/
www.heritageseeds.com.au      www.greenharvest.com.au
www.newgipps.com.au  www.fourseasonsherbs.com.au and www.diggers.com.au
Why is it good for you?
The fennel bulb is also an excellent source of Vitamin C
Fennel also has folate (Vitamin B), fibre and potassium.
One cup of fennel has 10.8 per cent of the daily fibre intake, 5.9 per cent of the daily folate and 10.3 per cent of the daily potassium.
Definitely worth a try.
AND THAT WAS YOUR VEGETABLE HERO SEGMENT FOR TODAY!

DESIGN ELEMENTS

with Jason Cornish landscape designer.
You might’ve seen green walls on gardening programs on television, in magazines or in situ inside a building or even on the outside.
You might’ve even though of building one to hide an ugly view but were put off by the cost and well, do the plants last in green walls?
Today’s landscape designer doesn’t beat around the bush when it comes to describing the pitfalls that greenwalls or vertical gardens have.

Jason also describes a simple method he thinks is a simple but fool-proof design for a DIY vertical garden.

Let’s find out  about them


There are lots of things to consider if planning a green wall, and I think you have to be really handy to build one yourself.
Otherwise buy one of those vertical garden modules that are easy to install and don’t require attaching to a fence.


PLANT OF THE WEEK

Ivory Curl Tree. Buckinghamia celsissima
Do you need a fast growing tree?
If you do, then you can’t go past this one then because it’s a robust native tree, you can keep it low by pruning, it’s evergreen and has creamy fragrant spires of flowers in summer and autumn.
A native of northern Queensland coastal rainforests, where it grows on deep well-drained volcanic soils.


Let’s find out about this plant.

Rainforest plants can be grown in most gardens provided they are given protection from the extremes of heat, cold and the drying winds.
Buckinghamia celsissima is a hardy reliable flowering tree which is often used as a street tree in many areas because of its adaptability.
It can either be grown as a tree, or be kept pruned as a shrub.
Ideally, ivory curl tree prefers full sun and deep well-drained soil, where it will develop a dense, compact, rounded crown of deep green leaves.


New growth is flushed bronze/red. Moderately fast growth can be expected if well-watered and fertilized in summer.
Although watering is necessary initially, once established, rainforest plants require no more water than other garden plants.
Ivory curl tree flowers, sort of look like those of Grevilleas, and native birds just love them as do bees because they’re a good food source.

Bushy foliage is made up of slender, shiny green leaves that have a velvety underside. New growth often has a pinkish red tinge.   Worth a try.

Sunday, 22 February 2015

Hens and Chickens Amongst the Roses.

 REAL WORLD GARDENER Wed. 5pm 2RRR 88.5fm Sydney, streaming live at www.2rrr.org.au and Across Australia on the Community Radio Network. www.realworldgardener.com
REALWORLD GARDENER NOW ON FACEBOOK
Real World Gardener is funded by the Community Broadcasting Foundation (CBF).
The complete CRN edition of RWG is available on http://www.cpod.org.au/ , just click on 2RRR to find this week’s edition. The new theme is sung by Harry Hughes from his album Songs of the Garden. You can hear samples of the album from the website www.songsofthegarden.com

PLANT DOCTOR

with Steve Falcioni general manager of www.ecoorganicgarden.com.au
As flowers go, roses are probably the most popular garden plant and cut flower.
Who doesn’t like receiving a bunch of roses?

Rosa Cornelius photo M Cannon
As gardeners and horticulturalists go, growing roses can be problematic if you’re trying to grow them out of their comfort zone.
The wrong spot or climate can make some problems seem hard to eradicate.
Let’s find out how to treat this next problem in the rose garden.


The scale itself is 203mm big, roughly circular and off white in colour. Rose scale stands out against the brown stems and can get a complete covering of the stem.
If you’ve only got one rose in a pot, then scrubbing off the scale with soapy water is probably all you need to do but you may not get all the crawlers and the problem will persist.
Rose scale
Or if you find a stem that’s just covered with so much scale that it’s practically white-get out the scrubbing brush or just prune it off.
Certainly a good scrub can break through all the layers if it's badly infested but then treat with eco Oil.
Otherwise, applying horticultural oil based on botanical oil is the best treatment for rose scale because it does the least harm to beneficial insects.
Also botanically based oils can be sprayed onto plants at higher day temperatures- up to 350 C If you have any questions about scale or rose scale or a photo of a plant you want diagnosed, send it in to realworldgardener@gmail.com or write in to 2RRR P.O. Box 644 Gladesville NSW 1675.

VEGETABLE HEROES


Well it’s TIME FOR VEGETABLE HERO 
One you’ve probably not heard of and one I’ve not grown myself.
Scorzonera also known as Black Salsify and black oyster plant.
 Scorzonera hispanica
This is a perennial root veggie from the sunflower or daisy family-that’s Asteraceae.

As you would expect then black salsify or scorzonera has yellow daisy-like flowers.
You might be thinking that black salsify is a new vegetable that some plant breeder has come up with but no, it’s been around for a few hundred years.
Native to southern Europe it was sold in markets in Syria in the mid 1500’s.
An interesting fact is that the roots were once a popular, though ineffectual, treatment for bubonic plague.
Did you know that the world’s largest producers of black salsify are France, Belgium and the Netherlands, and even Germany? Yes, that’s today.
I found an article by one of Australia’s top chefs Steve Manfredi
He says
"There is a newish member of the winter vegetable brigade called salsify. The root vegetable has been grown in Australia for some years. The small crop has been mostly gobbled up by restaurants and ethnic fruit markets. Its flavour is similar to white asparagus and Jerusalem artichoke but it really has a taste all its own.
There is some confusion with the name here in Australia.
Salsify (Tragopogon porrifolius) looks a lot like a hairy, creamy-brown carrot with leek-like leaves.
What is more commonly sold here as salsify is scorzonera (Scorzonera hispanica).
Though they are both members of the daisy family, scorzonera has black or dark brown skin and, rather than tapering like a carrot, it looks like a cane. While they are interchangeable in recipes, scorzonera is less bitter than salsify and more highly regarded, not to mention harder to pronounce."

What does it look like?
Scorzonera has long thin roots with chocolate coloured outer skin and a milky white inner flesh.
The skin you need to peel because it’s too tough to eat.
In the ground, the leaves don’t look anything like that of a carrot but more like a clump of grass.
So mark your veggie bed well where you plant it so you don’t mistake it for some grassy weed and pull it out.
For those lucky gardeners with good deep soil, you’ll be amazed to know that the tap root can grow up to a metre long.
Because it’s a perennial, if you leave it in the ground for two years, it’ll just get bigger.
In fact, you’ll probably end up doing this because they’re quite slow growing taking as much as 3-4 months.
Seeds are relatively easy to buy if you use mail order catalogues or online seed companies.

WHEN TO SOW
Sow your scorzonera seeds from spring right through to the end of summer.
Scorzonera seeds are a bit hard to germinate and take a long time, so don’t be too careful with the seeds because you can thin them out if they all come up.
As with carrots-use fresh seed because they don’t stay viable for long.
In fact, treat you black salsify seeds as you would carrots seeds-that is, plant them directly into the ground and use the same tricks that you did with carrots.
Like carrots and parsnips, scorzonera likes deep, loose soil.
Avoid adding manure as this causes the roots to fork.
Keep moist during the growing season.
You’ll get larger roots if you leave off harvesting until the second year. The roots are brittle, so dig them out carefully.

How do you eat black salsify?
Dig them up and scrub as best you can, then cook in their skins and peel. They have a savoury flavour that’s a little like artichoke hearts with a unique earthy flavour.
The roots are used in soups and mashed, while the leaves are eaten in salads.
You can also steam and eat the flower buds.
Steve Manfredi’s tips for cooking scorzonera are:
Preparing salsify is easy. First, peel and place immediately into acidulated water made by adding a little lemon juice or vinegar.
For soups it can be added raw in appropriate lengths.
If roasting or pan-frying, cook first in plenty of water for 10-15 minutes until tender.
If pureeing, cook a little longer so it's easily mashed.
Salsify is excellent with fish or shellfish, roast meats or in stews.
One thing that the top chef forgot to mention is that black salsify oozes a sticky white latex if you should break off a piece.
Wearing rubber gloves if you want to peel it before you boil it is recommended.
Otherwise cook it unpeeled.
Why Is It Good for You?
Black salsify has proteins, fats, asparagine, choline, laevulin, as well as minerals such as potassium, calcium, phosphorus, iron, sodium, and vitamins A, B1, E and high levels of vitamin C.
It also contains the glycoside inulin, also found in Jerusalem artichokes.


AND THAT WAS OUR VEGETABLE HERO SEGMENT FOR TODAY!

DESIGN ELEMENTS

with landscape designer Jason Cornish
Whether you’re short on space in the garden or you have a wall or fence that could do with some greenery, vertical gardens could be the answer.
Or are they really all that they are cracked up to be-a panacea for gardens short on space?
Perhaps they are instead something that is a drain on the pocket, and out time to keep them looking good. We examnine the pitfalls in part 1 of a 2 part look at vertical gardens.
But just what is a vertical garden and how do you make one and what are the pitfalls?
Venlo, Netherlands photo M Cannon
Let’s find out in part 1 of this  2part look at vertical gardens.

Vertical gardens sound impressive and difficult, and some of us have been procrastinating months if not years about building one.
Jason doesn’t beat around the bush and over the next two weeks we’ll be going through ways you can build a vertical garden and the pros and cons of having one.


PLANT OF THE WEEK

with Karen Smith from www.hortjournal.com.au
Do you have enough ferns in your garden filling out the shady damp places?
Fernery, Royal Botanic Gardens, Sydney. photo M Cannon
It’s amazing how some ferns spring up out of nowhere it places where you’d think it was impossible to grow ferns.
I have maiden hair ferns sprouting out of the bottom of a sandstone retaining wall and surviving without any care at all.
Hen and chicken fern, is another one that’s easy to grow and has an really interesting way of growing.
Let’s find out about this plant.

Asplenium bulbiferum, or Hen and Chicken fern,   is native to Australia and New Zealand.

In nature, native ferns usually are usually found growing in the damp, dim places that frogs would like to call home.
Asplenium bulbiferum-Hen and Chicken Fern
They will grow well outdoors in any shady area, as long as they have enough moisture and are protected from drying winds.
Use them as ground covers or accents in shady areas or along a north-facing wall or fence.


It's called a 'hen and chicken' fern because it grows small bulbils on the top of its fronds. 


Once these bulbils grow to about 5 cm (or are carrying three of four miniature fronds, they can be easily detached by pulling them off and planting them into small pots.).
If you don't pick them off, these  bulbils will fall off of the main plant and as long as the soil they land in is moist, they’ll develop a small root system and then start to grow on into a new ferns. 
In 3 to 6 months they will have developed a good sturdy root system and will be ready to pot on to the next size.

Much easier than propagating using the spore method.

Saturday, 14 February 2015

Sprouting With Goodness

 REAL WORLD GARDENER Wed. 5pm 2RRR 88.5fm Sydney, streaming live at www.2rrr.org.au and Across Australia on the Community Radio Network. www.realworldgardener.com
REALWORLD GARDENER NOW ON FACEBOOK
Real World Gardener is funded by the Community Broadcasting Foundation (CBF).
The complete CRN edition of RWG is available on http://www.cpod.org.au/ , just click on 2RRR to find this week’s edition. The new theme is sung by Harry Hughes from his album Songs of the Garden. You can hear samples of the album from the website www.songsofthegarden.com

SPICE IT UP

with Ian Hemphill from www.herbies.com.au

Fennel has its origins in the Mediterranean but today it's often thought of as a weed.
Fennel is sometimes sold as "Aniseed Plant," which although it has a faint aroma of aniseed because it contains anethole. But it's definitely a fennel.
Did you know that Fennel seeds were used by Romans as far back as 750 AD?
Fennel Seeds
Remember, a spice comes from the seeds and the herb from the leaves.
Also in this case, you can buy Fennel Pollen which is the fennel flowers with the pollen.
The flavour is delicate but with a distinct fennel aroma. Chefs sprinkle it on desserts.

Let’s find out what else this spice can be used for…

You can grow Florence fennel at this time of year in pretty much all of Australia. February and March seem to be the best time.
This veggie has a pale whitish green bulb with that has small shoots topped with ferny leaves.
The bulb can be used in lasagne,  shaved into salads in stir fries and has a pleasant aniseedy taste-not overpowering at all.
Florence Fennel bulbs

The leaves of course can be used as a garnish in lots of things as well.
Plants grow to about 60cm and need plenty of water and nutrients to stop them from going to seed.
If you want the seed, best buy it from a reputable source like Herbies Spices, so you know it doesn't contain rat droppings.
If you have any questions about growing fennel or a photo of your veggie bed, send it in to realworldgardener@gmail.com or write in to 2RRR P.O. Box 644 Gladesville NSW 1675.

VEGETABLE HEROES

Well it’s TIME FOR VEGETABLE HERO  Sprouts and shoots.
What’s something you can grow on your kitchen bench and it’s even something that schoolkids can do?
Sprouts of course.
Did you know those white sprouts that you see in Asian dishes or in packets in supermarkets are mung bean sprouts that you can do yourself?
Are you disappointed when you buy commercially prepared sprouts in that sealed plastic bag only to find that after a couple of days they’ve gone slimy and brown?
Or you go to the supermarket to buy sprouts only to find that they’re out of them?
If that’s you, then you need to grow your own sprouts.
All you need are the seeds to start with, a jar with a wide mouth and muslin  or cheesecloth or some other lightweight mesh to cover the top of the jar, a rubber band and water.
Oh and a dark place to put your sprout jar until they’ve sprouted then you need to move them to a lighter location, otherwise they won’t grow and will probably go mouldy.
That’s it.
Here’s a tip: don’t use seeds that are meant to be sown in the garden because these may be treated with a fungicide.
In fact it’s best to use organic seed that are sold as sprouting seeds.
Also seeds that are split, like split lentils and split peas aren’t any good for sprouting.
You need whole seeds most likely from the health food section of your supermarket or a health food store or from a seed supplier.
Start off with mung beans, green peas or lentils.
Did you know there’s about 50 different types of seeds that you can sprout?
From Alfalfa, Dill, and Fenugreek, through to sunflower seeds.
Another tip: sprouts will need their water changed a couple of times a day.
If you’re going away for a couple of days and won’t be able to rinse your sprouts then don’t start them.
How to grow sprouts.
Sprouts can be grown all year even in winter, but you’ll need a warm kitchen at that time.
Remove any broken or discoloured seeds, stones, twigs, or hulls that may have found their way into your sprouting seeds.
Place one type of seed in the jar.
Use about a tablespoon of seeds or one-third cup of beans.
Why so little? Because you’re going to be soaking the beans or seeds and they’ll grow in size when they sprout.
Cover the seeds with distilled or filtered water.
How much water?
For a couple of tablespoons of seeds, cover with at least one cup of water. For beans, nuts, or grains, use at least three times the water of the amount of seed.
That will meant one cup of water for one third cup of mung beans for example.
The seeds need to soak for about 6 to 12 hours in general but some need more and some need less.
Small seeds: 3-8 hours
 Larger seeds or legumes: 8-16 hours
Grains: 10-16 hours
It’s a good idea to start them before going to bed if you’re working, otherwise during the daytime is fine.
Cover the jar with the cheesecloth and make the cloth tight using a rubber band.
Then drain off the water.
Rinse the beans or seeds with fresh water and drain off the water again.
Set upside down in a clean, cool spot in your kitchen area, preferably on a slight angle to allow excess water to drain off.
Otherwise you could put the jar on a stainless steel dish drying rack which gives the sprout jars the perfect angle for draining.
Rinse the sprouts two to three times a day.
Be sure to drain them well each time so they’re not sitting in any water.
When the jar is full the sprouts or legumes are ready to use.
Alfalfa or mung bean sprouts are ready in about a week.
Now’s the time to put them in a large bowl of cool water and stir them around to loosen hulls and Skins from the seeds (this is an optional step).
They’ll usually come to the top so you can remove them.
Don’t worry about removing every hull but if you do take the time to remove the hulls, the sprouts will last longer.
Drain your sprouts well and store in the refrigerator covered for a week to 10 days, depending on the sprout type.
Store in an airtight container (a capped sprouting jar is fine) in the fridge.
Don’t put them into a plastic bag because they’ll go slimy.

If this sounds like to much hard work, there are electric sprouter kits available too. www.greenharvest.com.au www. and www.diggers.com.au


These (Easy Green)  automatic sprouters will: soak, rinse, mist, oxygenate and drain through the full seed to sprout growth cycle.
Some can hold 5 cartridge-style sprouting trays (supplied 320 x 60 mm,)
So you can have 5 different sprouts or use the one big tree for larger quantities of wheat, barley or oats.
You can also buy sprouter jars with special sprout friendly lids-have mesh for airflow and come with a stand that leans at 450.
How do you use sprouts-one great dish to put them on top of is Laksa-a sort of spicey soup with noodles and your choice of fish, chicken, meat or tofu.
Why Is It Good for You?
Sprouts are full of antioxidants; they’re also full of protein, chlorophyll, vitamins, minerals and amino acids.
Plus they have beneficial enzymes making them easy to digest.
AND THAT WAS OUR VEGETABLE HERO SEGMENT FOR TODAY!

DESIGN ELEMENTS

with garden designer Lesley Simpson

Royal Palace Seville photo M Cannon
When you think of oriental gardens, do you think of a quiet peaceful place where you can sit and meditate?
Where does the term Moorish garden or the Moors come from?
Back in Spain during the 8th century until the 14th century, the Arabs that invaded, conquered and ruled Spain, were referred to as Moors.
The oldest preserved Moorish garden is the palace in Granada in south of Spain.
You need to book well ahead to visit that particular garden.
Instead of all that-
Let’s find out how to create an moorish garden….
PLAY: Moorish Gardens_11th February 2015
Moorish gardens always have a water feature and a courtyard or patio.
These gardens always seem to include mandarins, cypresses, oranges and oleanders.
If you have any questions about how to create a  moorish garden why not write in?

PLANT OF THE WEEK

with Hort Journal Editor Karen Smith

Pimelia linifolia and Pimelea "Sunset Blush."

Pimelea linifolia photo M Cannon

If you like native flowers, you’ll like this delicate pom pom style of flower that cluster together like smaller versions of Hydrangea flowers.

The flowers always stand out against the dark green leaves.
Only a small perennial plant that can be grown in pots, small courtyards or patios.
Let’s find out about this plant.

Pimelea ferruginea-The "pink rice flower" is a low, densely growing shrub to 1 metre x 1-2 metres in width.
It will grow in a range of soil types as long as the drainage is reasonable. The plant is well suited to coastal gardens and will grow in full sun or partial shade.
Pimelea-the species does best in temperate, and cool temperate and coastal areas, not liking humidity that much.
The grafted variety is a different kettle of fish and can grow almost anywhere, say the growers. Worth a try.