Pages

Sunday 27 July 2014

Get Loopers, Grow Veggie Scraps, Smell Boronias

REAL WORLD GARDENER Wed. 5pm 2RRR 88.5fm Sydney, streaming live at www.2rrr.org.au and Across Australia on the Community Radio Network. www.realworldgardener.com
REALWORLD GARDENER NOW ON FACEBOOK
The complete CRN edition of RWG is available on http://www.cpod.org.au/ , just click on 2RRR to find this week’s edition. The new theme is sung by Harry Hughes from his album Songs of the Garden. You can hear samples of the album from the website www.songsofthegarden.com

PLANT DOCTOR

with Steve Falcioni from www.ecoorganicgarden.com.au


The caterpillar stage of various moths, and butterflies eat the leaves and flowers of your plants non-stop and can destroy your crops almost overnight.eaten by this pest.

Somehow they’ve eluded being caught because they blend in so well with the colour of the leaves.

Loopers are very tenuous-the Basil leaves on the left were washed and dunked in water, yet these loopers managed to stick on.
The only alternative was to go over every single leaf to see how many there where!

The not so friendly garden looper.
Let’s find out what you can do about them.
Keep the garden free of weeds, check susceptible plants for garden looper eggs and crush them before they hatch.
They’re quite small so look very carefully.
Check the undersides of leaves for young looper larvae.
Hand pick and destroy them by dropping the caterpillars in soapy water.
You can net your veggie bed with fine netting to stop the moths laying their eggs.
For a rather yukky remedy you can try Cabbage looper soup spray.Larvae are susceptible to a virus that kills them.
And infected caterpillars will look yellow or white, and swollen.
Blend these sick caterpillars with water and spray it on plants to infect other larvae.
Best thing to apply is Dipel which contains Bacillus thuringensis when larvae are young.
If you have any questions about garden loopers why don’t you drop us a line to realworldgardener@gmail.com or write in to 2RRR P.O. Box 644 Gladesville NSW 1675.

VEGETABLE HEROES

Growing veggies from scraps!
Who knew that you can re-grow celery, spring onions and a whole bunch of veggies from their scraps?
That’s right leeks, lemongrass, bok choy, cabbage, potatoes, garlic and ginger, -all these plus more.
There’s there are heaps of different foods that will re- grow from the scrap pieces that you’d normally throw out or put into your compost bin.
 Here’s howLet’s start with Celery, yes celery, it’s quite simple: just stand the base of the celery bunch in a small dish of water for a week or so until new leaves appear in the centre.
The leaves will be yellow at first, and once they really emerge and turn green, you can plant the celery in the ground or in a pot.
How about re-growing Leeks, Shallots Spring Onions and Fennel?You can either use the white root end of a vegetable that you’ve already cut, or buy a handful of new vegetables to use specifically for growing.
Simply place the white root end in a glass jar with a little water, and leave it in a sunny position. I keep mine in the kitchen window.
The green leafy part of the plant will continue to shoot. When it’s time to cook, just snip off what you need from the green growth and leave the white root end in water to keep growing.
Freshen up the water each week or you’ll have a regular supply of leeks shallots and spring onions.
As for Lemongrass
Lemongrass grows just like any other grass.
Same thing to re-grow it, place the root end (after you’ve cut the rest off) in a glass jar with a little water, and leave it in a sunny position.
Within a week or so, new growth will start to appear.
Transplant your lemongrass into a pot and leave it in a sunny outdoor position. You can harvest your lemongrass when the stalks reach around a foot tall – just cut off what you need and leave the plant to keep growing.

What about Bok Choi, Romaine Lettuce & Cabbage?


Just like leeks, these vegetables will re-grow from the white root end.
Cut the stalks off as you normally would, and place the root end in a shallow bowl of water – enough to cover the roots but not the top of your cutting.
Put your leek celery or bok choy in a sunny spot, spraying occasionally with water to keep the top moist.
After a few days, you should start to see roots and new leaves appear.
After a couple of weeks or so, transplant it into soil with just the leaves showing above the level of the soil.
The plant will continue to grow, and within a few weeks it will sprout a whole new head.

TIP:If you don’t like the idea of have jars cluttering up your windowsill with bits of veggies stuck in them you can plant your cutting directly into soil (without starting the process in water)
But you will need to keep the soil very moist for the first week until the new shoots start to appear.

GINGER
If you like Asian cooking you’ll like to grow your own Ginger.
Ginger is very easy to re-grow. Simply plant a spare piece of ginger rhizome (the thick knobbly bit you cook with) in potting soil with the newest (ie. smallest) buds facing upward.
Ginger prefers filtered, not direct, sun in a warm moist environment.
Before long it will start to grow new shoots and roots.
Once the plant is established and you’re ready to harvest, pull up the whole plant, roots and all.
Remove a piece of the rhizome, and re-plant it to repeat the process.
Of course if you’re not in the right climatic zone, you will have to grow this one indoors for a bit before putting it outside.
For those gardeners in cool temperate areas, Ginger makes a very attractive indoor-plant, so if you don’t use a lot of ginger in your cooking you can still enjoy the lovely plant in between harvests.
POTATOES


We all probably know about re-growing potatoes.
Re-growing potatoes is a great way to avoid waste, as you can re-grow potatoes from any old potato that has ‘eyes’ growing on it.
Pick a potato that has robust eyes, and cut it into pieces around 5cm square, making sure that each piece has at least one or two eyes.
Leave the cut pieces to sit at room temperature for a day or two, which allows the cut areas to dry and callous over.
This prevents the potato piece from rotting after you plant it, so that the new shoots get the maximum nutrition from each potato piece.
Potato plants need a high-nutrient environment, so make sure you’ve added compost to your soil before you plant them.
Plant your potato pieces around 20cm deep with the eye facing upward, and cover it with around 10cm of soil, leaving the other 10cm empty.
As your potato grows and more roots appear, add more compost/potting mix or soil, depending on whether you’re growing your potatoes in a grow bag, in the ground or in a compost bin.
If your plant really takes off, mound more soil around the base of the plant to help support its growth.
Garlic is another easy one that I’m sure a lot of gardeners have tried already.
Garlic quite often sprouts in the fridge even so of course you can re-grow a plant from just a single clove.
Just plant it, root-end down, in a warm position with plenty of direct sunlight. The garlic will root itself and produce new shoots.
Once established, cut back the shoots and the plant will put all its energy into producing a tasty big garlic bulb.
And like ginger, you can repeat the process with your new bulb.

ONIONS are one of the easiest vegetables to grow from scraps too.
Just cut off the root end of your onion, leaving about 1-2 cms of onion on the roots. This needs to go into a sunny spot in the garden  then cover the top with soil. Keep the soil moist.
Onions prefer a warm sunny environment, so if you live in a colder climate, keep them in pots and move them indoors during frostier months.
As you use your home-grown onions, keep re-planting the root ends you cut off, and you’ll may never need to buy onions again.
TIP: One thing to note-if you try this with root veggies say a carrot, a plant that re-grows from planting a carrot top will NOT produce edible carrots, only a new carrot plant.
The vegetable itself is a taproot which can’t re-grow once it has been removed from the plant.
MUSHROOMS
Lastly, one for the mushroom officionado.

Mushrooms can re-grow from their stalks but they’re one of the more difficult vegies to re-grow. Mushrooms like darkness, warmth and humidity and nutrient-rich soil.
This time you need a mix of soil and compost in a pot (not in the ground) so your re-growth is portable and you can control the temperature of your mushroom.
Gardeners have reported the most success with a warm filtered light during the day and a cool temperature at night.
Just remove the head of the mushroom and plant the stalk in the soil, leaving just the top exposed.
In the right conditions, the base will grow a whole new head. Apparently  you’ll know fairly quickly if your mushroom has taken to the soil as it’ll either start to grow or start to rot in the first few days.
AND THAT WAS OUR VEGETABLE HERO SEGMENT FOR TODAY!

DESIGN ELEMENTS

with landscape designer Jason Cornish

Have you got a pool that you don’t use any more?
The kids have grown up and it’s just sitting there looking a bit green.


You might need more space that the unwanted pool is taking up.


Pools cost quite a bit to put it in so what happens when they become just one big drain on the pocket?


Filling them in is an option, but that’ll be quite expensive too.
So what else can you do with that pool, even with a budget in mind?


Let’s find out what this is all about.


Something to think about if you don’t want that pool anymore. Besides the unused pool is probably acting like a pond anyway, but you can make it into a more environmentally friendly ecosystem what will attract dragonflies and even small birds if you plant sedges along the edges.
Apart from the environmental benefits, you'll be using less chemicals-good for your hip pocket and the planet.
Less power usage if you don't want or need a pump in the pond.
You can still swim in the pool if you like and the conversion is reversible.
Pool conversions are more practical than just filling in the hole and you have something aesthetic too.


PLANT OF THE WEEK

Muogaumurra nature reserve


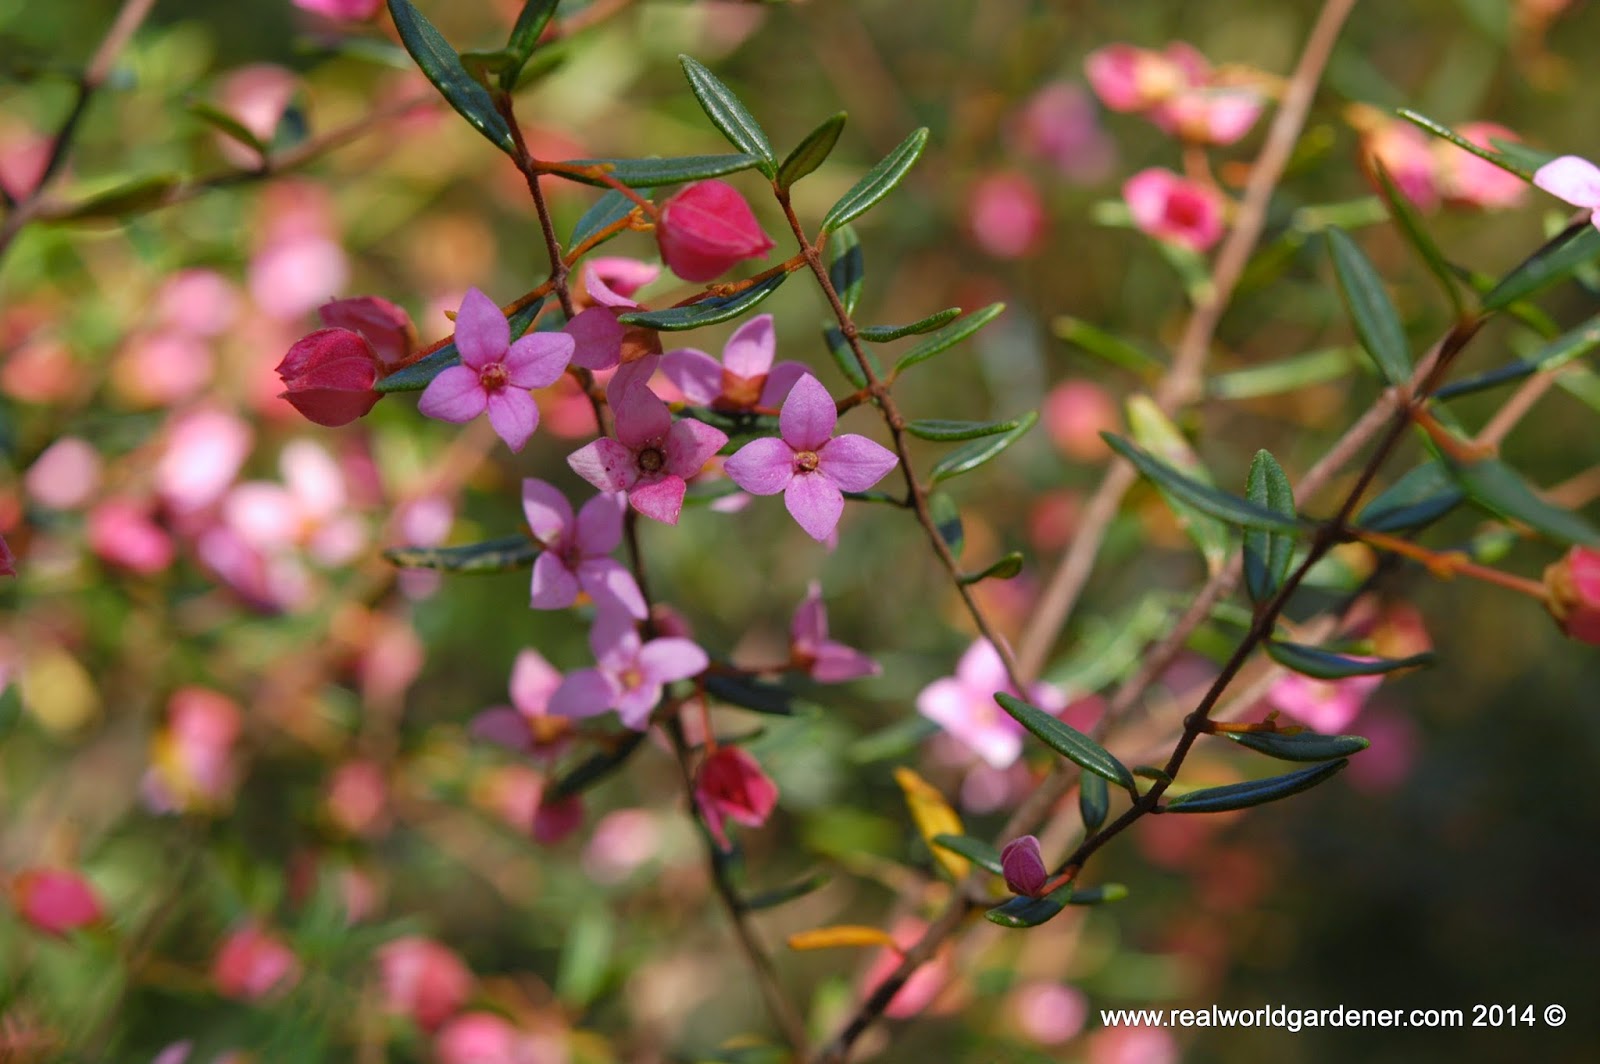
Boronias are small shrubs that grow all over Australia.
Those Boronias that grow naturally on the eastern states are much more longer longer than there exotic cousins from Western Australia.
But regardless of where they come from, Boronias put on a perfumed show that’s hard to resist.
Most highly perfumed and most prized Boronias are from WA and most of the plants you come across at regular retail nurseries are propagated from cuttings.

WHY ARE PLANTS FRAGRANT ?

The fragrance of flowers is thought to be mostly to attract insects, birds and animals to pollinate the flowers. This may attract a range of pollinators or only one e.g. Red clover which is only pollinated by bees. Boronias - Boronia megastigma varieties (The brown Boronia), and B. serrulata have very fragrant flowers. B. 'Sunset Serenade' and B. denticulata have aromatic foliage. Tips for growing Boronia
     Most important-excellent drainage, so sandy soil or raised beds.
  Don’t let the plant dry out but don’t overwater it, especially in humid weather because this plant and many other Australian plants are prone to getting root rot fungus that loves moist warm soil.
Protect the roots from soil temperature variations-either by planting in an easterly or north easterly aspect or under an open canopy tree, like a gum tree, and protect from winds. Mulching is paramount, and the stones theory might work too.
  Prune-yes Australian plants need pruning in the home garden. Don’t be afraid.  For Boronias prune when they are growing strongly, especially the flowers. Put them in a vase.
Fertilise Boronias in Autumn, not Spring, otherwise you won’t get many flowers and just green growth. Use organic fertilisers or some controlled release ferts-the ones with coated small balls.
Lastly, as soon as you buy your plant, think about taking cuttings-from February to April-take firm new growth, that happened after flowering.
They should strike in 6 weeks if you put them in a mini-greenhouse.

Some cultivars
·        'Harlequin' - red and yellow striped flowers
·        'Heaven Scent'- compact cultivar with brown flowers
·        'Jack Macguire's Red' - red flowering form
·        'Lutea' - yellow flowering form
·        'Royale' - dwarf form
·        Other hybrid boronias are grown simply for their attractive flowers, rather than their perfume, including ‘Purple Jared’ (brilliant purple flowers), ‘Aussie Rose’ (rose pink flowers) and ‘Lipstick’ (lollypop pink flowers).

·        Climate: Boronias are at their best in the cooler areas of southern Western Australia, the Dandenongs and Mornington Peninsula in Victoria, Tasmania and the Blue Mountains of New South Wales.

Try growing from seed. Try grafting if you’re an advanced gardener. Use Correa as root stock.

Specialist native nurseries graft Boronia megastigma on to root stock of eastern Boronia species, that tend to produce much stronger root systems when grown from cuttings.


Sunday 20 July 2014

Plants Forever Perennial and Perpetual

THE GOOD EARTH


Suppose someone said to you that there’s an easier way to garden than those annual veggies that you keep sowing and growing each year, what would you say?
Also suppose a new agricultural breakthrough promised more produce, a longer growing season and much less work would you want to know about it?
These claims aren’t some get quick rich scheme  but does  involve a bit of a change in the way we do our veggie but doesn’t replace it of course.
 Nature’s ecosystems always include not only annual vegetables, but also perennials — edible roots, shoots, leaves, flowers and fruits that produce year after year. Besides fruit-bearing trees and shrubs, more than 100 species of perennial vegetables can grow well year after year in a spot in your garden.
Let’s find out what some of the they are? I'm talking with Margaret Mossakowska and Lucinda Coates from www.permaculturenorth.org.au


Perennial vegetables are in addition to fruit and nut trees to a productive garden.
You can grow rhubarb, artichokes, asparagus, sorrel, garlic, banana, yacon-apple of the earth, strawberry, arrowroot,  and Malabar spinach just to name  few.
You will need a permanent spot in the garden for these vegetables-somewhere with a fair amount of sun and where they won't be disturbed for many years to come. Of course, besides you harvesting your crop.
If you have any questions about perennial vegetables and where you can get them, drop us a line to realworldgardener@gmail.com or write in to 2RRR P.O. Box 644 Gladesville NSW 1675.

VEGETABLE HEROES

Not just Spinach but Perpetual spinach or Beta vulgarisDid you know that Spinach and silverbeet seed was sent out from England in 1787 with the First Fleet but in the new colony they found spinach difficult to grow?
They found growing silverbeet much easier, which is why Silverbeet is sometimes called spinach in Australia, but true spinach has smaller leaves and a much sweeter, milder flavour.
That brings me to our hero today-perpetual spinach is neither perpetual or spinach.
Silverbeet 'Perpetual' or, Leaf Beet as it’s sometimes called is a very long-lasting leaf vegetable but unfortunately not 'perpetual'.
So what’s the difference between perpetual spinach and silverbeet?
Perpetual spinach or perpetual silverbeet, has smoother leaves than other silverbeet with narrower, greenish stems.
It’s tender with a taste more like English Spinach but it’s hardy and drought resistant.
This beginner-friendly plant is a cut-and-come-again crop that just keeps on giving.
The perfect plant for small but busy gardens.
HOW WHEN TO SOWIn all but the coldest districts, you can grow perpetual spinach for most of the year.
Also known as spinach beet,  for a continuous supply of spinach, make several sowings throughout the year.
The bonus is that Perpetual spinach will continue on through to summer and autumn and possibly even into the following year.
Germination of spinach seeds can take anything between a week and 2 weeks.
Plant your seedlings / seeds around 7cm apart in rows about 30 apart.
For once a vegetable that grows well in partial to full sun.
Perpetual Spinach likes a moist but not waterlogged soil.
Using a mulch of straw or grass clippings can help to keep moisture and warmth in the soil plus add plenty of compost and the usual organic matter to so that your spinach will grow well.
Having a worm farm or compost bin really does help your veggie bed no end!
Perpetual Spinach doesn't like acidic soils, a good PH is around 6.3 -6.8. Add lime to the soil if you need to a few weeks before you put the seeds in.
Spinach like all leafy vegetables is what’s called a heavy feeder –ie, needs lots of Nitrogen to grow well.
If you haven’t already applied Blood and Bone or cow manures to the soil a month or two ago, your soil will run out of nutrients.
During the cooler months of winter, organic matter doesn’t break down that much and to get the needed Nitrogen, applying liquid fertilisers such as compost tea or fish emulsion often will be the best way to go
Another thing to remember is that Spinach grows on shallow roots, so don't dig vigorously around it. If you get weeds because you didn’t mulch, carefully hand remove them.
Water frequently to keep up with the fast growth of the plants.
In about 8-10 weeks, your Spinach plant has put on enough big leaves so you can pick them one by one like you might lettuce. The leaves will keep regrowing for quite a while. Otherwise pick the whole plant for Spinach pie etc. Make sure you wash spinach leaves well - soil is not tasty!
When you want to store Spinach in the fridge a tip to remember is that
Spinach is highly ethylene sensitive. To stop leaf yellowing don’t refrigerate with apples, or tomatoes.

TIP: Water liberally in dry periods. Unlike true spinach, spinach beet won't bolt when exposed to a full summer sun, but don't let plants flower as this will shorten your cropping season.
Picking off flowerheads encourages the plant to grow leaves, not flowers.


TIP:What might eat your perpetual spinach.
Possums or even rats may eat the seedlings, so either cover with nets or grow under other plants. Slugs and snails love young leaves, so set up a slug pub and organise a midnight watch if necessary.

TIP: Pick to eat and freeze, washed and dried leaves for cooking.
Don’t worry if you don’t have a veggie plot or it’s full up with other things like onions, broccoli, cabbages and the like because perpetual spinach's is a great veg for container growing on a sunny ledge: thin and pick as and when required.


A problem you might get in the cooler weather is Down Mildew. Downy mildew (Blue mold). What is downy mildew- fungal disease, shows up as slightly yellow or chlorotic lesions of irregular shape on the top surface of the leaves and purplish sporulation on the underside. To prevent it, space plants for good air circulation and, when you water, wet the ground around the plants not the foliage itself


Why should you grow your own Perpetual Spinach?
 Because Spinach is best eaten fresh and it loses nutritional properties every day.
Putting it in the fridge slows the deterioration, but half of the major nutrients are lost by the eighth day after harvest.

Why is Spinach good for you?
The amount of iron in spinach comes way down the list after vitamins A and C, thiamin, potassium and folic acid (one of the B complex vitamins).
Dark green leafy vegetables, like spinach, contain carotenoids.
If you have any questions about growing spinach or any other vegetable write in or email me.
AND THAT WAS OUR VEGETABLE HERO SEGMENT
      www.greenharvest.com.au and www.diggers.com.au

DESIGN ELEMENTS

with landscape designer Louise McDaid
Would you like a bunch of flowers in your house most weeks of the year, even every month would be good wouldn’t it?
Flowers can cost quite a bit but what if it didn’t cost that much at all?
How could we do that you ask, well it’s all from a cutting garden.


We love flowers in the garden, but they’re lovely to bring inside as well. I love cutting aromatic foliage – herbs and scented leaves that give off their smell when brushed – and flowers from shrubs where you cut some of the leaf with the flower. Camellias are lovely for this – japonicas rather than sasanqua which shatter and are best enjoyed as a petal carpet on the ground.


You might have an area of a large garden you can give over to a ‘cutting garden’, as flowers grown for cutting may have different features to ones you would normally choose for your garden – for cutting consider long stems, large flowers and not too much worry about form or foliage – and how it will look inside your home, what scents and colours you like indoors. Choosing plants for your garden is how they look in situ so the overall features of the plant are much more important.
Let’s find out what this is all about.
PLAY: Unusual Themes_cutting garden pt _5 16th  July 2014
With a designated cutting bed, you can plant and cut without worry.
Select an inconspicuous location -- along a garage or in a back corner of your yard -- and be sure your cutting bed receives lots of sun and has some good soil that’s well-drained -- just like your other beds.

A cutting garden has plenty of planting freedom.
Its sole purpose is to produce flowers for you to cut, so don't worry about how it will look.
You can mix and match colours, textures, heights, and varieties. Plant all your favourites.

PLANT OF THE WEEK

PINKS SPLASH RANGE

They say that polka dots never go out of style, and the same could be said about pink flowers.
There is actually a pink splash plant that has polka dots on it-what a combination.
Pink flowers are used as a symbol of love and awareness.
Did you know that for decades, pink flowers have been used to decorate weddings as a symbol of love?


More recently, pink flowers have come to symbolize breast cancer awareness.
Or you could say thanks with pink flowers or just enjoy them yourself.
If you’re looking for that special plant for a special occasion, be it a birthday,
Easter, Mother’s Day, or an everyday gift – or you’re looking for a plant for
yourself why not go for a Pink Splash.
Every plant in the Pink Splash range will create a wow factor with their
striking colours and what’s more you can select a plant for colour in any
season – Spring, Summer, Autumn and Winter – with most providing
colour over more than one, and it can grow in cool temperate as well as warm temperate regions.


Sunday 13 July 2014

Layer Upon Layer of Birdlife

WILDLIFE IN FOCUS

Spotted Pardalote

Do you like bushwalking or just walking through a park or reserve? As you walk through do you look at all the different patterns and textures?
Spotted Pardalote-photo courtesy of Geo Nature


Parks, reserves and the bush is not just groups of trees. They’re made up of many different interconnected layers of plants and animals, all with different sunlight and moisture needs.
Let’s find out what birds occupy the different layers of greenery.
 I'm talking.with ecologist Sue Stevens

Did you know that there were so many layers within a forest, or bushland that birds occupy.
Not just the two or three that are most obvious.
Spangled Drongo-photo Geo Nature

Within this layered structure of plants in the bush or reserve live a vast number of birds and insects.
These animals also occupy different positions in the various layers of trees shrubs and groundcovers.
For example, the White Browed Scrub Wren lives in thick bush, but the grey fantail prefers thin bush.
Within the tree layers there's top, middle and the trunk that could be occupied by tree creepers, spangled, spangled drongos and spotted pardalotes right at the top.
Some birds live at the tops of the trees and feed on berries, while others, collect insects from the bush floor.
Red Browed Finch feeding on grass seeds-photo Geo Nature

Some insects live high in the different trees, feeding on leaves or other insects, some live in rotted logs, while others, find their habitat in the leaf litter on the forest or bush floor.
Then there's water birds,-shore birds, waders and pelagic birds which are those sea birds that don't come to shore.
If you have any questions about birds that occupy different habitat layers or have a photo to send it, drop us a line to realworldgardener@gmail.com or write in to 2RRR P.O. Box 644 Gladesville NSW 1675.
 

VEGETABLE HEROES

Well it’s TIME FOR VEGETABLE HEROES  Celery

Originally not a vegetable meant for consumption, celery was used for medicinal purposes, as a flavouring herb, and sometimes fed to horses. Celery or Apium graveolens is in the same family as carrots.

If you’ve ever let your celery self seed you would’ve noticed that the leaves become a bit feather and the flowers look like those of carrots.

Did you know that celery leaves and inflorescences or flowers were part of the garlands found in the tomb of pharaoh Tutankhamun (died 1323 BC),?

Another interesting bit of trivia is the romans used celery seed in pills for relieving pain (as described by Aulus Cornelius Celsus) around 30 AD.

The Greeks believed celery to be a holy plant and so it's not surprising they wore necklaces of it at their version of Olympic Games.

For the ancients there was not much difference between celery and parsley. In fact the name for parsley actually means rock-celery.
Have you tried growing Celery and found it to be too much work?
Celery has had that reputation of being a difficult crop to grow, mainly because traditional varieties need a lot of work and attention - they have to be planted in deep trenches and require layers of soil added regularly to blanch the green stems. Otherwise the celery tastes too strong and bitter.
I know of one gardener who uses sheets of corrugated iron against his celery patch to blanch them. Must love his celery!

When to Grow

In sub-tropical districts you can plant them from April until November, Tropical districts only from March until July.
In temperate zones-August until December.
For Arid areas-May until August.
Finally cool temperate districts-I’m afraid you’ll have to wait until September, then you’ll have until the end of December

What Celery likes:

Celery prefers moisture, well-drained soil in a sunny spot. Apart from Beetroot last week that can grow in partial shade-this is like a mantra to growing all vegetables.
A short row can be squeezed into a garden, raised bed or you could even try dotting the odd plant into a border. If you have a tiny garden it's possible to grow celery in very deep, long tomato style pots.
Celery is a biennial plant (which means that they flower, fruit, then die in the second year) but are generally grown as an annual.
Celery prefers warm days and cool nights and grows best in a clay to sandy soil with plenty of moisture.
Soil preparation
Dig the soil (in the spring before planting), removing big stones, weeds and incorporating plenty of garden compost or well-rotted manure.
A week or so before planting, rake a general purpose organic fertiliser (90g per square metre) into the surface layer of the bed.
How to sow seeds
If you have time, plants can be started off by sowing seeds
The seeds take 1-2 weeks to germinate.
Celery seed is tiny, so take a pinch and lightly sow across the surface of the soil. Watering from the top is likely to disturb the seed, so fill a bowl with water and put in the pot. It can be removed once the water has been drawn to the surface.
Finish by covering with a thin layer of vermiculite and putting in a heated propagator on a windowsill or in a greenhouse. Water daily to ensure the compost doesn't dry out.
Take the seedlings out of the propagator when they've germinated. They're ready to be given pots of their own when the first proper leaves have formed.  That means at least 4 leaves.

Plants will be ready to go outside about five weeks later, when they're 8cm tall.

For perfect plants with lots of well-branched sticks, plant celery seedlings about 27cm  or a ruler width apart making sure that the crown of the plant is at ground level.

Plants will grow better if they're arranged in a grid pattern, rather than planted in long rows.

TIP: The secret to fresh crisp stalks is plenty of manure and water, don't let the soil dry out as it has shallow roots.
Keep celery well-watered and the area around them free from weeds.
Plants can be given a boost by feeding with a balanced liquid fertiliser about a month after planting.

Harvesting
Celery will be ready for picking in about 3 ½ to5 months, depending on the variety you grow.
When picking your celery just lift plants using a hand fork, taking care not to damage neighbouring plants.

One of the main advantages of growing your own is that you can individually pick the stems one by one rather than taking out the whole bunch.

TIP: For best flavour and longer storage, water celery plants the day before harvest.

Best Varieties
Did you know there are, self-blanching varieties that don't need earthing up to produce tender white stems?
A variety called Celery Dorata D' Asti and Celery var. Dulce is available from Diggers Seeds www.diggerseeds.com.au
and Stringless American that is normal to use unblanched is available Green Harvest organic seeds.
I'll be getting my seeds from them rather than buying celery seedlings and having to try and blanch (unsuccessfully) then ending up with bitter tasting celery.

The Dorata  variety is easier to grow than other varieties, remaining crisp and juicy without the need for blanching. The lime-green stems can be snapped off from summer through to autumn and winter.
Although plants can be grown from seed sown in early spring, it's far easier to buy ready-grown seedlings, which can be planted out in August onwards, depending on what zone in Australia you live..
There's also a Golden self Blanching variety, which by all accounts, tastes the best. www.edenseeds.com.au  

Why is it good for you?
On top of the above celery health benefits, celery is known to be a negative calories vegetable.
Which means that the body uses more energy to digest than absorb calories from it!
Add the fact that Celery's high water content and fibrous nature mean that it is great for those who like to snack without gaining weight
A medium stalk of celery contains around 10 calories, 2g of carbohydrates, 1g of protein, zero fats and cholesterol!
Celery leaves can also be eaten or used in soups or used to make celery  juice.                            www.greenharvest.com.au

AND THAT WAS OUR VEGETABLE HERO SEGMENT
     www.greenharvest.com.au www.newgipps.com.au


DESIGN ELEMENTS

with landscape designer Louise McDaid
 Research by the Nursery and Garden Industry of Australia has shown that a lot of people visiting garden centres find them intimidating places.
Perhaps it’s the myriad choices, especially in spring when flowers are in full bloom, or it’s all those botanical names-a different language really.
It’s easy to be overwhelmed and buy the same annuals you’ve always had or simply choose plants, seed packets or bulbs that catch your eye. These approaches aren’t exactly the most inspiring way to plan a garden.
Stephanotis climber-highly scented
And if scent’s important to your you might want to consider this next theme
Let’s find out what this is all about.


Themes give you a way to organize plants around an idea.

Princess Pink Lavender-New Release
That challenges you to make it more interesting, and you’re going to come up with an original idea.

A theme may also reflect your passion. If scent is important to you, you’ll be attracted to a perfume garden.

As in any garden, it’s important to choose plants appropriate to your climate and the area’s sun exposure. Plants with similar water and sun-exposure needs should be planted together.
Plants like rosemary don’t need a lot of water, but thyme and basil need regular watering, -So that kind of thing can affect your plant groupings.
 

PLANT OF THE WEEK


PINK PLASH RANGE OF PLANTS
They say that polka dots never go out of style, and the same could be said about pink flowers.
There is actually a pink splash plant that has polka dots on it-what a combination.
Pink flowers are used as a symbol of love and awareness.
 
Did you know that for decades, pink flowers have been used to decorate weddings as a symbol of love? More recently, pink flowers have come to symbolize breast cancer awareness.
Or you could say thanks with pink flowers or just enjoy them yourself.
If you’re looking for that special plant for a special occasion, be it a birthday,Easter, Mother’s Day, or an everyday gift – or you’re looking for a plant for yourself why not go for a Pink Splash.
Every plant in the Pink Splash range will create a wow factor with their striking colours and what’s more you can select a plant for colour in any season – Spring, Summer, Autumn and Winter – with most providing colour over more than one, and it can grow in cool temperate as well as warm temperate regions.
 
Available from Sprint Horticulture http://sprinthorticulture.com/